Getting Started
Follow these steps to quickly set up and start working on this project:
- Fork the Repository:
-
Begin by forking this repository to your GitHub account.
-
Clone the Repository:
-
Clone your forked repository to your local machine:
-
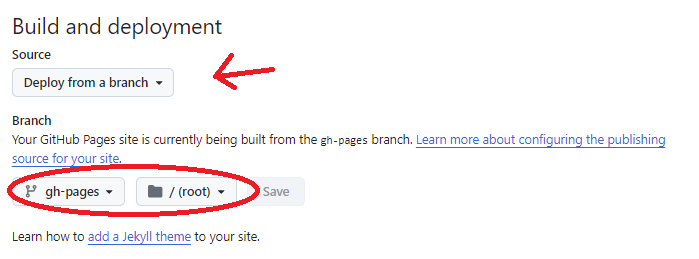
Configure GitHub Pages:
- In your
docs-templatesrepository settings, go to Actions -> Pages. - Set the Build and Deployment source to
Deploy from a branch. - Choose the
gh-pagesbranch and set the folder to /(root). -
Save your changes.
-
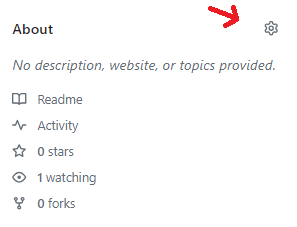
Configure Gist:
-
In the repository's About section, click the Settings gear icon.
-
Enable the
Use your GitHub Pages Websiteoption and Save the changes.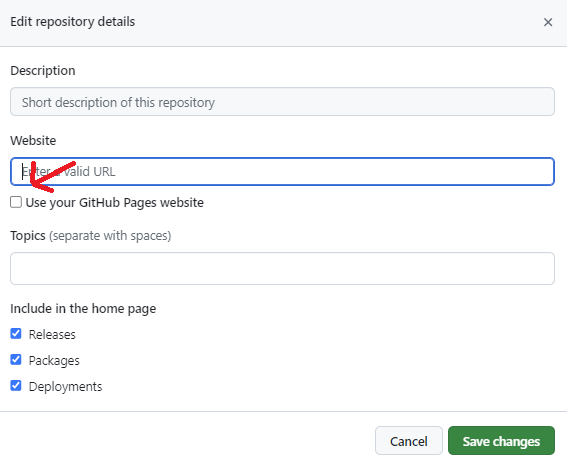
-
Customize Markdown Files:
-
The
actionsandpagesin this template are set up to build your gist based on the structure defined inmkdocs.ymlunder thenavsection. -
The
navsection is where you define the structure of your documentation site. You can create nested pages to organize your content into sections and subsections, providing a clear hierarchy for users to navigate. For example, to add nested subsections within a section, yournavmight look like this: -
In this example:
Section 3contains anOverviewpage and aDetailssection with two subsections.- Each entry under
navcorresponds to a markdown file that you have created in thedocs/directory. - You can rename sections, subsections, and pages as needed to match your documentation structure.
-
Rename sections and corresponding markdown files as needed. Ensure the
naventries inmkdocs.ymlmatch your markdown file names. -
After editing or adding markdown files, commit and push your changes:
-
Rename sections and corresponding markdown files as needed. Ensure the
naventries inmkdocs.ymlmatch your markdown file names. -
Navigate to your Gist and see your finished product!